Course
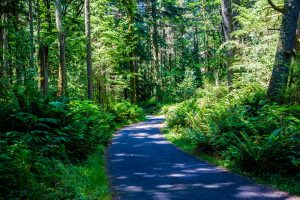
Nestled in the watershed of Redmond, Washington, The Golf Club at Redmond Ridge offers 18 holes of championship golf designed by celebrated architect Gary Panks. The course is a testament to the contemporary Northwest golfing experience blending the natural beauty of the area with pristine course conditions and demanding water features. Winding through a network of dense, native forests, and skirting a series of carefully preserved wetlands during the early part of the round, the course ultimately treats players to spectacular views of the Cascade Mountains as they make their way back to the clubhouse.
Redmond Ridge is a golfer favorite in the greater Seattle area, regarded for the character and challenge packed into the par-70 layout.
Par 4
315 yards
Redmond Ridge Opener – The stress-free opening tee shot on the 1st hole at Redmond Ridge sets the tone for your round. A straight drive down the center of the fairway avoids the two bunkers flanking the midway and the greenside bunker to the right, leaving you with a manageable approach to the green.


Par 3
165 yards
The Downhill Challenge – This downhill par 3 offers a thrilling challenge. The green is guarded by a pot bunker on the left, sand on the right, and a pond behind. Before selecting your club, assess the wind’s direction carefully to make the right shot.


Par 5
566 yards
The Boulder’s Guidance – Stretching over 600 yards from the back tee, this lengthy par 5 features a prominent boulder in the fairway, serving as a landmark for your approach. As the fairway narrows towards the green, precision becomes crucial.


Par 3
144 yards
Signature Waterside Par 3 – Our picturesque signature par 3 is a gem, surrounded by water and the Trilogy clubhouse. Opting for the left side of the pin is a wise strategy here.


Par 4
430 yards
The Long and Straight Challenge – A long and straight par 4. This hole demands a precise tee shot with woods to the left and houses to the right. Negotiate the elevated green, guarded by a water hazard short left, and consider a strategic bail-out to the right for a manageable up and down.


Par 5
485 yards
The Disappearing Fairway – On this par 5, the fairway vanishes from view 250 yards ahead. A well-placed drive followed by a calculated lay-up sets you up for a manageable approach to the large green, but beware of the water hazard lurking short.


Par 3
150 yards
Elevated Par 3 Finale – The final par 3 on the front 9 requires at least one club extra due to the elevation change. With a cluster of bunkers protecting the deep green to the right, precision is paramount.


Par 4
403 yards
Strategic Par 4 – This par 4 features a slight dogleg to the left, with hazards flanking both sides. A solitary bunker guards the undulated fairway’s left side, while a hazard on the right demands a precise approach shot.


Par 4
330 yards
Front 9 Finale – The front 9 concludes with a demanding tee shot, navigating hazards on both sides of the fairway. Deep bunkers on the right and left pose challenges, especially for the approach shot to the deep and narrow green.


Par 4
380 yards
Mid-hole Strategy – A straightforward mid-hole with opportunities to the right of the fairway, but beware of veering left off the tee. Aim for the right bunker to set up your next shot.


Par 4
314 yards
Sloping Fairway Challenge – A challenging short par 4, just over 300 yards. The fairway slopes left to right, demanding precision off the tee. A short iron or wedge into the green is your best play here, but be wary of the undulating terrain.


Par 3
144 yards
The Downhill Dilemma – Descending down a slope, this par 3 presents a strategic challenge. A water hazard on the left and sand trap short and right of the green requires careful shot selection. The entire hole slopes from right to left, adding complexity to your approach.


Par 4
480 yards
Sasquatch’s Domain – Known as the “Sasquatch Hole,” this signature par 4 offers a thrilling challenge. With a significant elevation change and a blind shot to the green, precision is key. Aim for the American flag for a chance at birdie, but keep an eye out for Sasquatch lurking in the woods.


Par 4
350 yards
Wetlands Challenge – A challenging par 4 with a tight tee shot to clear wetlands. The fairway opens up to the right but slopes right to left, adding difficulty to your approach. The green is well-guarded by five greenside bunkers, testing your accuracy.


Par 3
148 yards
Uphill Battle – An uphill par 3 with a water hazard to the left of the tee box adds to the challenge, especially from the blues. Longer rough separates the approach and tee box, requiring precision off the tee. While the green slopes, making for a challenging putt, this hole is known as the highest handicap hole on the course.


Par 4
354 yards
Scenic Straightaway – Enjoy the breathtaking view from Corky’s Bench as you wait for your turn on this long, straight par 4. A blind shot off the tee leads to a fairway with a slight downhill run toward the green, testing your accuracy and distance control.


Par 4
420 yards
The Decisive Second Shot – A long and challenging par 4, the key to this hole lies in the second shot. As the fairway tightens closer to the approach, strategic placement is crucial. With a water hazard to the left and a greenside bunker, accuracy is paramount for a successful approach.


Par 5
520 yards
The Final Stretch – After a scenic drive through the woods, you reach the final tee box on the 18th hole. Finish your round with a long, straight drive, navigating a water hazard along the cart path on the left and a sand trap and trees along the fairway on the right. The large, flat green is guarded by three bunkers, providing a fitting conclusion to your round.


Practice Facility
The Golf Club at Redmond Ridge offers an expansive Practice Facility that caters to all your needs. The full-swing Practice Facility features multiple target greens from several grass tee stations, and a large practice green to get your putting work in.
Practice Facility Rates
| Small Bucket | $11.00 |
| Large Bucket | $15.00 |
Practice Facility Plans (20% off)
| 20 Large Buckets | $240.00 |
| 40 Large Buckets | $480.00 |
All prices listed include tax. Pricing subject to change.